Good morning everyone! I hope that you all had a great week end after the big Turkey day! It feels like Christmas is coming so quickly, all at once! I am kind of freakin' out! Too much to do and not enough time.... never enough money! Oh well, that's the way it goes. Don't need what you can't afford. LOL!!!
On with my late recipes. I had a really crazy day yesterday and really did not have a chance to post these until today. (That's not my excuse every week, is it??!!) LOL! True story!!!!
The first recipe I want to share with you is the one that my sister brought home from the physical therapy re-hab center that she goes to during the day a few days a week. Part of her therapy is cooking so she shared on of her favorites with me. I made this for supper last night and I am kind of glad that I waited to post about it today. Now I have made it too and I can fill ya in on what my hubby and I thought of it too......YUMMY!!!!!
LORI'S TACO SALAD
1 head of Iceberg lettuce
1 bar Cracker Barrel sharp cheese
4 tomatoes
1/2 c Miracle Whip
1 #hamburg
1 16oz bottle Catalina dressing--I used the fat free, it tastes just as good!
1 can of kidney beans
1 bag of Doritos
***Okay so now you are understanding the love of this recipe already, right?!!!
Saute the hamburg, drain. Cut up lettuce and tomatoes, and place in a large bowl. Add hamburg and kidney beans. Cut up cheese into small cubes and add to the bowl. Mix in the Miracle Whip. Crush Doritos into small pieces (no larger than a half dollar). Add chips and Catalina dressing just before serving.
Oh my Gosh---this was as good as it sounds. I am kind of bad though-we don't like the healthiest part-the beans so I left those out. I did add in an onion and next time I think that I will put in some black olives too. This was so quick to make up and a fun supper as well. Give this one a try. If nothing more the Doritos should at least tempt them to try it. It worked for me! LOL!!!
The next recipe that I want to share with you all is one that Samantha showed me before Thanksgiving and we decided to try these out for ourselves. These little yummies were a delicious hit! They are called Peeta's Stuffed Cheese Buns and you can get the recipe and photo here: http://www.yammiesnoshery.com/2012/08/peetas-stuffed-cheese-buns.html So the recipe tells you how to make these rolls home made but, I did not have the time to make these so I took a short cut and went to Wal-mart and got frozen Rhodes Dinner Rolls. These are in a bag and you can feel the frozen little rolls. They did not come in a tray, they are in a bag, loose. Anyway, we thawed the rolls out on a greased baking sheet and covered them with non stick sprayed wrap. After they had thawed, we stuffed them with string cheese. Yes, I bought some mozzarella string cheese sticks and Samantha cut them into quarters and we stuffed each roll with two quarters of the cheese and then we folded and pinched the cheese in tightly and put them back on the pan. I also thought that the garlic butter went on before they cooked so that is what we did next and then sprinkled them with some more cheese as per the directions. We recovered them and let them sit in the refrigerator overnight and baked them right before the meal so they were hot and yummy when we were eating. (You do not have to put them in the refrigerator overnight but, if you needed to it works out fine). These were super delicious, because we were able to use a lot of little short cuts, they were quick and easy. Not only will I make these again.....due to hubby's cravings, I already have. And so has Samantha!
These recipes are both absolutely worth trying and definitely quick and easy. I hope that you all get a chance to make some up soon for your families.
*********Next week I will be sharing the recipe that I get most requests for and have only started sharing it this Fall!! My Christmas Caramel Corn! I can't wait to share with you!**************
I hope that you all continue to have a great day. I am going to try and enjoy the few snow flakes that are falling around here!
Warm and primitive blessings to you all!
prim_bug
Wednesday, November 28, 2012
Thursday, November 22, 2012
HAPPY THANKSGIVING
Good morning everyone! I thought that I would take a little time to myself this morning and sit down and wish you all a wonderful Thanksgiving. I hope that your day is filled with thankfulness, family, friends, love, caring, sharing, joy, peace, happiness, (this could go on for quite a while)! I guess that what I am trying to say is: Have a very Happy Thanksgiving!! I hope that your day is well spent and enjoyed the way it should be. Just don't forget to be thankful! And remember those that are less fortunate. Remember those that are serving our country and those that have served. Remember those that were struck by Hurricane Sandy. Just remember, no matter how bad it sometimes gets, we all have so much to be thankful for!
One extra thing that I am thankful for this year is....... all of you! Thanks so much for checking in with me. I appreciate and love it more than any of you could possibly know! Thank you all!
I hope that your day is Blessed and filled with Thanksgiving! Enjoy!!!!!!!!!!
Warm and primitive blessings to you all!!!
prim_bug
Tuesday, November 20, 2012
TEMPTATION TUESDAY
Good morning everyone! What a crazy and hectic week! Just remember, we are all in it together! And we are all doing this to spend a wonderful day with loved ones. It is so worth it. I have a couple of quick recipes for you today. I hope that this first recipe might help you to keep your family happy while you may be preparing the last of your big feast.
The first recipe is for a party mix, I got the recipe out of a magazine and I have made it several times. I try to save it for around the holidays because that makes it a little more special when I do make it. This recipe did not come from the Chex recipes so, I have had a great fear of losing it. Now I don't have to worry. LOL! One less thing that I have to think of.
GINGERBREAD PARTY MIX
3 c cinnamon chex
3 c rice chex
1 1/2 c cinnamon graham snacks (like teddy grahams)
6 tbsp butter
1 tsp cinnamon
1/4 tsp ground cloves
1/4 tsp nutmeg
2 tsp vanilla
2 tbsp crystallized ginger, chopped
1/4 c white vanilla baking chips
In a large microwave bowl (do not use glass---last year when I was making up a batch of this, my glass bowl busted when I took this out of the microwave), add cereals and graham snacks; set aside. In a small microwave bowl, microwave butter for 40 seconds or until melted. Stir in cinnamon, cloves, nutmeg, and vanilla until blended. Pour over cereal until coated.
Microwave uncovered on high for 5 mins, stirring every 2 mins. Stir in ginger until blended.
In a small microwave bowl, microwave vanilla baking chips uncovered on high for 1 minute, stirring every 30 seconds until melted. Drizzle over snack. Let stand until set. Store in airtight container.
Oh my gosh, this is so yummy!!!! If you could ask my family they would tell you the same thing. It is a quick fix and has alot of good flavor. We really enjoy it.
For the second recipe I have chosen one that I got from the Food Network. I saw this on TV and it looked so good that I had to make some up the very next day. It was delicious!
CHOCOLATE RICE PUDDING
2/3 c white rice
3 c whole milk
1/2 c sugar
pinch of salt
1/2 c chocolate chips ( I used white chips---WOW---that was good, next I want to try it with
butterscotch chips----YUMMMMMM)
1 tsp vanilla extract
In a medium pot, bring 1 1/3 c water to a boil. Add the rice, cover and turn the heat to low. Cook until all the water has been absorbed and rice is tender, about 15 minutes. Let cool until warm.
To the pot with the rice, stir in the milk, sugar and salt. Bring to a simmer, turn the heat to low and cook until the mixture is thickened, about 10 mins. (It took alot longer than that when I made mine)! Remove from the heat, stir in the chips and vanilla and let rest for 5 mins. Serve warm or cover and cool in refrigerator for at least 1 hour.
Tip----- If you use the white chips and refrigerate any leftovers, the leftovers form a grittiness to them. But, when you reheat the pudding it loses that grit. And is smooth again. My mom said that she thought it must be to do with the oils in the white chocolate...makes sense white chocolate can be difficult to melt down at times. Just thought that I would share that info with you all.
I hope that you can give these recipes a shot. We obviously love them and hope that you and your family will too! Two more days til Turkey Day! Have a good afternoon and happy cooking to you all!
Warm and primitive blessings to you all!
prim_bug
Monday, November 19, 2012
CANDY CANE TUTORIAL PART 3, THE FINAL STEPS!
Good morning everyone. I hope that you all had a great week end. Ours was.... interesting. I will leave it at that until the end of the blog today and then you will see for yourself. Okay so, for today we will be doing step 3, the final step of the candy canes tutorial. I did take some pictures but my camera does nothing to help out. So sorry! I am hoping that Santa will find it in his heart to bring me a camera this year..... if I have been good!
Alright so the last blog was you papier macheing the canes and then you have let them totally dry out.
 This is what you should have to work with now.
 I tried to get a close up of mine so that you could see how rough it is. If yours are rough and bumpy that is what they are supposed to be like. So, no worries..... until you get the sand paper out. I think that this is the worst step to me. It is a pain in the butt. But, it is what makes the candy canes look the way that you want them to.
 This is after I had sanded it. Yucky picture but, the candy cane is pretty smooth.
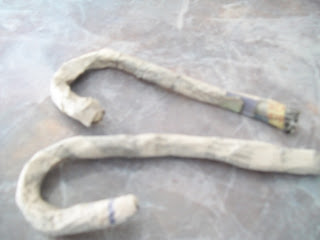 I was trying to show you the difference in the sanded and unsanded. The front candy cane has been sanded down and the on e in the back is waiting to be done. Still bumpy and rough.
 I wanted to try and show you when you are sanding the inside of the bend, I cupped the candy cane in my hand and then used my thumb to kind of sand it down. It is really hard to explain but, you do want to be gentle with them too. I put too much pressure on one of mine and it snapped. Just kind of cradle it and sand it at the same time. You can sand these down as much or little as you like. I try to get any loose paper edges sanded down and if I rub over the candy cane I make sure that nothing is sticking out or rough feeling. I used a very fine sand paper and I cut it into pieces that were manageable around the candy canes, like below;
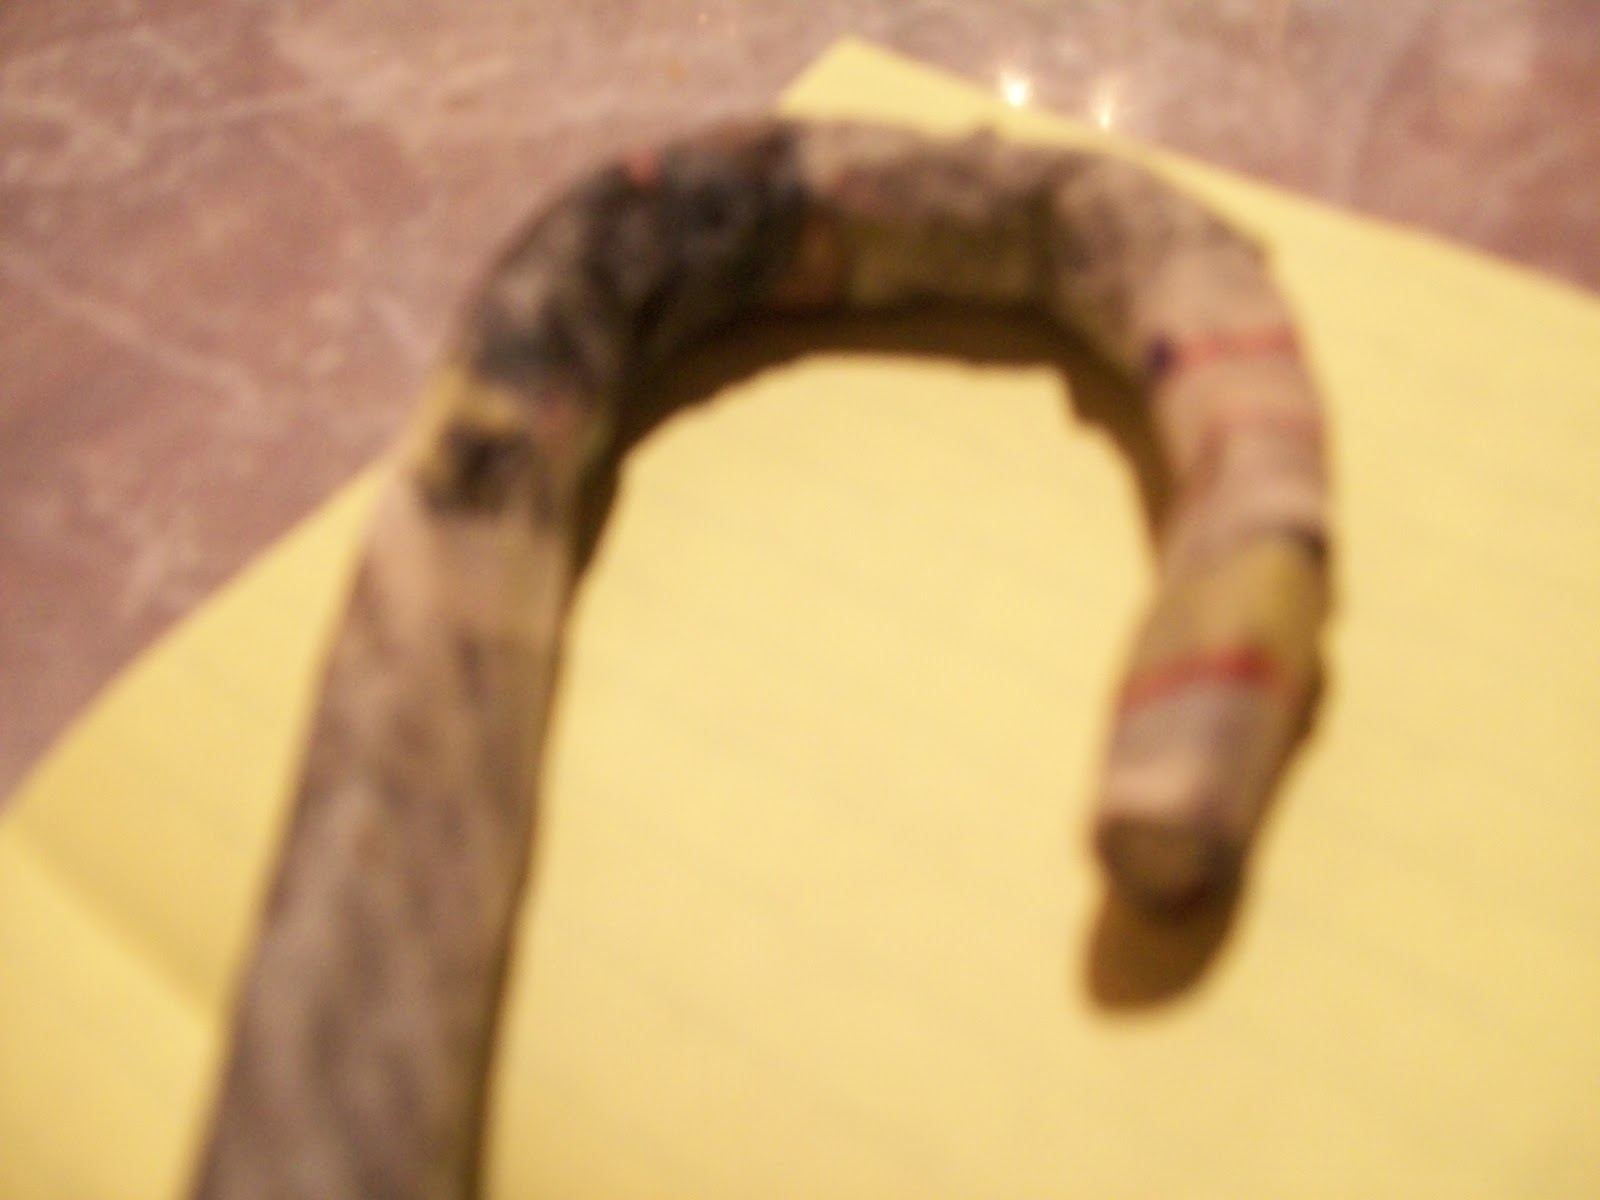
 After you are finished sanding these little guys. You then want to go on and paint them all white. I put two layers of white on to make sure that the newspaper didn't show through. Let the white dry and then I take a smaller brush and paint the red or burgundy, whatever color you choose, (I used Folk Art- Vintage white and Americana-Cranberry wine) stripes on. I start at the bended tip and work my way down the candy cane. Like this:

I just start painting the stripes on and work my way down the candy cane. You can do this free hand like I did, you can go back and touch up with the white if you need to, or you can pencil in some stripes and then fill it. I like doing it free hand because it looks like something that is NOT machine made. The wiggles and off spacing just add more character to it. But, if you prefer it more structured, by all means do it that way. This is all about personal preference.
 Here is my first one, all striped up. Nothing perfect about this little baby. I am loving it though. Now, at this point if you like the sparkly glitter you could do that. I prefer mine darkened. Make sure to give your paint a day or two to dry before you put the Lustra on. Otherwise, (trust me from experience), the paint wipes right off with the wax.
 Quite a difference in what they start out as and what you can turn them into. The last step for mine will be the Lustra Wax.
.JPG) This is a "Fine European Hard Finishing Wax". The color that I use is Dark Brown. I get this at a local shop but it lists a website if you cannot find it in your area. www.Lustersheen.com I hope that this will help you out. I use this stuff on everything. If I get some old furniture at a garage sale or Goodwill, this is what it gets coated with. Anyway, this is the final step to the candy canes. You just rub this on with an old t shirt or something like that. Rub on a little to begin with and then you just keep adding more and more to the desired darkness that you are looking for. I tend to go dark on mine. To me it just makes it look as old as I wish that it was.
This is a "Fine European Hard Finishing Wax". The color that I use is Dark Brown. I get this at a local shop but it lists a website if you cannot find it in your area. www.Lustersheen.com I hope that this will help you out. I use this stuff on everything. If I get some old furniture at a garage sale or Goodwill, this is what it gets coated with. Anyway, this is the final step to the candy canes. You just rub this on with an old t shirt or something like that. Rub on a little to begin with and then you just keep adding more and more to the desired darkness that you are looking for. I tend to go dark on mine. To me it just makes it look as old as I wish that it was.
Well I hope that you have enjoyed the candy cane tutorial. They look amazing on the tree, or anywhere for that matter. If I had enough patience I would make these up for everyone I know and love. I am not so excited about the sanding part though, not to mention the papier mache! They are definitely worth the effort. And there is nothing better than looking at ornaments and decorations that you have made to put on your tree. Unfortunately, once you start, you don't want anything but, homemade. You can't just pick up a box of those candy canes at your local Wal-mart!
Now, for the part about our interesting, week end......! See for yourself;
 Meet Jackson!!!!!!!!! The guy that works with my husband had to get rid of him:(!!!!! I have a very special place in my heart for animals :)!!!!! So, with the recent loss of Miss Frankie, and the big hole still in my heart. Well, I couldn't bear to hear of anything happening to the BIG guy! Look at that face! The only thing about him that I do not like is that he is an outdoors dog. He is about 5 years old and has been outside for his whole life. I personally like my babies to be in the house. We have alot to do before we can even attempt to make this happen. I am hopeful that by summer maybe Jackson will be in the house with the rest of the family but for now, he has to be outside:( !!!!!!


Hubby with Jackson! At this point, I don't know who loves who more. They have formed quite a bond since Friday already. I can't imagine what they will be like in another month! <3

I love this picture of him. He just sits and poses for you, like he knows that you are taking his picture!

And we cannot forget my little man-Jeffrey! Unfortunately, Jeffrey hurt his leg the day that Jackson came. He went to jump up on my bed so he could look out the window and somehow hurt it. He has to walk three legged and is in quite a bit of pain. I pray that he starts to come around soon.
 And, last but not least, my man Kayzer! He is not too fond of Jackson yet. He is one of the issues that we need to work on. But, look at that face. Is he adorable or what???! I am a very fortunate person and I am very thankful for all of my babies!
I wish that you all have a wonderful day today. I hope that you are all prepared and getting ready for Thursday. Good luck with your candy canes and if you get stuck or need any help, please feel free to leave a comment. I will get back to you as soon as I can.
Warm primitive blessings to you all!
prim_bug
Alright so the last blog was you papier macheing the canes and then you have let them totally dry out.


I just start painting the stripes on and work my way down the candy cane. You can do this free hand like I did, you can go back and touch up with the white if you need to, or you can pencil in some stripes and then fill it. I like doing it free hand because it looks like something that is NOT machine made. The wiggles and off spacing just add more character to it. But, if you prefer it more structured, by all means do it that way. This is all about personal preference.


.JPG)
Well I hope that you have enjoyed the candy cane tutorial. They look amazing on the tree, or anywhere for that matter. If I had enough patience I would make these up for everyone I know and love. I am not so excited about the sanding part though, not to mention the papier mache! They are definitely worth the effort. And there is nothing better than looking at ornaments and decorations that you have made to put on your tree. Unfortunately, once you start, you don't want anything but, homemade. You can't just pick up a box of those candy canes at your local Wal-mart!
Now, for the part about our interesting, week end......! See for yourself;


Hubby with Jackson! At this point, I don't know who loves who more. They have formed quite a bond since Friday already. I can't imagine what they will be like in another month! <3

I love this picture of him. He just sits and poses for you, like he knows that you are taking his picture!

And we cannot forget my little man-Jeffrey! Unfortunately, Jeffrey hurt his leg the day that Jackson came. He went to jump up on my bed so he could look out the window and somehow hurt it. He has to walk three legged and is in quite a bit of pain. I pray that he starts to come around soon.

I wish that you all have a wonderful day today. I hope that you are all prepared and getting ready for Thursday. Good luck with your candy canes and if you get stuck or need any help, please feel free to leave a comment. I will get back to you as soon as I can.
Warm primitive blessings to you all!
prim_bug
Tuesday, November 13, 2012
IT'S A RAINY TEMPTATION TUESDAY
Good afternoon everyone. This is a late afternoon posting but, you gotta admit, I got the right day finally! I hope that everything is going good for all of you. It is rainy and foggy here. It could be worse and snowing so...... I shall just let it rain and smile :) !!!!!!!
For today's recipes I thought that I would share a couple of my moms recipes that I have had for a while. I hope that you all enjoy them. These are both great yummy treats to make up and share as gifts. I still am having a hard time thinking that Thanksgiving is just over a week away. Time sure flies by. Enjoy it as it does.
This first recipe is for some:
HOMEMADE NEEDHAMS
1 small potato
1 c shredded coconut
1 lb powdered sugar
1/2 teas vanilla
1/4 teas salt
2 squares of chocolate (I just melt down some chocolate chips for this part)
small piece of butter
Boil potato until tender, mash and add sugar gradually. Add salt, vanilla and coconut. Grease an 8" pan. Press mixture into pan. Melt 2 squares of chocolate and add a small piece of butter to this. Pour over potato mix and use the back of spoon to spread smoothly. Allow to set. Cut into squares.
These are yummy and my mom used to make these all the time.
MOM'S MOLASSES COOKIES
1 c molasses
1 1/2 c sugar
1 c crisco
1 tsp each; ginger, cloves and cinnamon
1 c hot water
1 tsp baking soda
1 tsp baking powder
4 c flour approx- sometimes it needs a little more or less
Put shortening , sugar and molasses in pan and heat until the shortening melts. Cool a little. Put baking soda and powder in a bowl. Add hot water. Pour into the first mixture. Stir in the flour and spices. Mix until the dough is stiff. Cool in refrigerator. Roll out onto floured surface and and sprinkle dough with sugar. Cut with mouth of drinking glass or whatever cutter you desire. Bake at 350 for 12-15 mins.
These are the BEST molasses cookies you will ever taste...... of course I am a little partial to the tastes that I grew up enjoying. That being said, I still feel like these are the best molasses cookies that you will ever make. Give them a try. They smell so delicious while cooking and they are a nice tender cookie with such a great molasses flavor. Sit down with a cup of coffee, tea or milk and have a nice little treat before all the holiday rush starts!!!
I hope that you all will enjoy these family recipes and maybe make them a part of your family's traditions as well. Have a great afternoon and evening. Now go get baking. I am sure that you know someone that would just LOVE one of those goodies above!
How are your candy canes coming? I hope to have part 3 by Friday or Monday the latest.
Warm and primitive blessings to you all!
prim_bug
Monday, November 12, 2012
CANDY CANE TUTORIAL PART 2
Good morning everyone!!! Happy Veterans Day to all those who served and are continuing to serve this great country that we are all privileged to live in because of our Veterans! (I know Veterans Day was yesterday but it is still being observed today too). And, I don't believe that we can thank them all enough for what they do. So again, thanks to all of you!!!!!!!!!!!!!
I hope that you all had a great week end. We did here. I feel as though I have accomplished alot. For starters this part of the candy cane tutorial. We are almost done. Yeah!! So, for today you will all need:
newspaper-cut into strips that are small enough for your candy canes
1 1/2 c water
1 c flour
1/4 c Elmer's glue
something to cover your work area
tote lid or something to place canes on so they wont stick
*Make sure to take off your jewelry, this gets a little sticky and messy but, it makes you feel like a kid again. LOL!
Okay, to start you just mix your water, flour and glue in a bowl that is big enough to dip your strips of newspaper in. Like this:
 And I cut my newspaper in half and then cut it into little strips. This is what mine looked like:
 Nothing perfect about any of this. One thing that I will stress to ya, after doing up a few of these. I remembered just how sloppy it is to make these. Make sure that you aren't wearing anything good. I ruined one of my shirts because I thought that I would be careful enough, hahhhh!! Careful has nothing to do with it, it is sloppy and messy.
Anyway, the first thing you do is take a paper strip and dunk it into the glue mix. As you pull it out, take your fingers and slide the excess glue off. I basically slid the paper up through my thumb and finger. That seemed to work well for me. Then you start to wrap it around your candy cane. I usually start at the bottom and try to wrap around the end first. Then I try to twist a little and start to wrap on a diagonal up toward the top. Your newspaper might rip and that's okay, just start from where it ripped and continue on. I will tell you that the bend in the candy cane is kind of a ....pain! Just work through it. It is definitely worth it. It doesn't have to be perfect either because once these little beauties dry, we will be sanding them down and taking care of the imperfections that we can't live with..... keep in mind though that some of those imperfections are what gives each candy cane its character. I have a lot of canes with flat spots on them and bumps and each one is so different from the next. You just gotta love em!! So, this is what it looked like after I had put one layer of newspaper on:
 Kind of sloppy, not perfect at all. That's okay. Now, you want to put at least two layers of newspaper around the whole candy cane because when you go to sand it down you don't want to sand through to the aluminum foil. I would suggest putting three layers on but, it is up to you. Do up all of your candy canes and place them on a tote lid so that they can sit undisturbed and easily moved for a few days to dry out. You want these to totally dry out before you move on to the next step because they can mold if you do not give them enough time. So, here's a few more pics of mine:


 I love the bumpiness on this one! Awesome!!!
 On this photo I was trying to show you the tips, and how they look when they are wrapped.
 This is the next day when they had started drying real nice.
 Same in this picture. Dried out and looking good!
 I tried to show you a little closer what they look like after a day of just drying. They are coming along nicely.
I need to get running now. I hope this explains part 2 clear enough for you all. If you have any questions please feel free to post them and I will respond as soon as I receive it. I hope that you continue with a great day and I will be back on tomorrow with some recipes!!!!!
Warm and primitive blessings to you all!
prim_bug
I hope that you all had a great week end. We did here. I feel as though I have accomplished alot. For starters this part of the candy cane tutorial. We are almost done. Yeah!! So, for today you will all need:
newspaper-cut into strips that are small enough for your candy canes
1 1/2 c water
1 c flour
1/4 c Elmer's glue
something to cover your work area
tote lid or something to place canes on so they wont stick
*Make sure to take off your jewelry, this gets a little sticky and messy but, it makes you feel like a kid again. LOL!
Okay, to start you just mix your water, flour and glue in a bowl that is big enough to dip your strips of newspaper in. Like this:


Anyway, the first thing you do is take a paper strip and dunk it into the glue mix. As you pull it out, take your fingers and slide the excess glue off. I basically slid the paper up through my thumb and finger. That seemed to work well for me. Then you start to wrap it around your candy cane. I usually start at the bottom and try to wrap around the end first. Then I try to twist a little and start to wrap on a diagonal up toward the top. Your newspaper might rip and that's okay, just start from where it ripped and continue on. I will tell you that the bend in the candy cane is kind of a ....pain! Just work through it. It is definitely worth it. It doesn't have to be perfect either because once these little beauties dry, we will be sanding them down and taking care of the imperfections that we can't live with..... keep in mind though that some of those imperfections are what gives each candy cane its character. I have a lot of canes with flat spots on them and bumps and each one is so different from the next. You just gotta love em!! So, this is what it looked like after I had put one layer of newspaper on:


I need to get running now. I hope this explains part 2 clear enough for you all. If you have any questions please feel free to post them and I will respond as soon as I receive it. I hope that you continue with a great day and I will be back on tomorrow with some recipes!!!!!
Warm and primitive blessings to you all!
prim_bug
Friday, November 9, 2012
PART ONE OF CANDY CANE TUTORIAL
Good morning. For those of you who are still breathing and not shocked to near death (I know two blogs in a row), this one is for you. So, yesterday after putting my recipes on here for ya. I was thinking geesh, I need to get going on those candy canes. Then I figured it would probably be best if I did it in little segments. Especially where the glue part takes a few days to truly dry them out. This way here, you can make yours along with me at the same time I am making mine. That seemed a little funner to me. It will kind of be like we are sitting here making our candy canes together. Would you like a cup of Hot Vanilla or Hot Cocoa???? I want a Hot Vanilla!
Anyway the first part of this is just your aluminum foil. Simple, right?! I remember a while ago I told you to start saving your pieces of aluminum foil for this and I hope that you all did. Here's a look at my piece;
 Okay, this was a piece of foil that I have used a few times for painting and dusting with cinnamon and spices. It has been used it's fair share but, I am not done with it yet! Depending on the size of candy cane you want, you start rolling up the edge of foil. Try to roll this tightly as you go. I started with the small edge and rolled toward the top.
 It's a fuzzy picture but, you get the idea. There is nothing difficult about this at all. Don't be afraid, this is all going to be covered up by another layer----the papier mache. When you have finished rolling your candy cane. I used about half of the sheet of foil. You will just tear the foil off and wrap it around tightly. When you finish it should look like this:
 Okay. That's not so hard now is it? At this point you will want to tuck in your ends. You just fold over a small flap on each end and kind of squeeze it on tightly. It should look like this:
 Wonderful picture but, again you can kind of see what I am talking about here. The next step is to put the bend in your candy cane. That is basically it---- you just bend the tip over and form it into the shape that you want your cane to be. Like this:
 Voila! You did it!! This is the first step into making the candy canes! Easy Peasy!!!!! You can do these in the evening while watching television or take some time and craft away during the day. From that one sheet of foil, I made three candy canes and they are all different sizes. You can do them as large or small as you want. Just keep in mind, when you go real small sometimes the steps are a little more challenging. After we papier mache these and they dry we need to sand down the rough spots. That takes time and is very tedious. On a small, small candy cane it would be a pain to me but, if you are adventurous feel free. On a tiny tree these canes would look amazing! I, myself do not have the patience to do that. For those who do, have fun! Here is a picture of the three that I made up of that one piece of foil:
 There you have it, step 1 in the candy cane making process.
Now, I would like to say that I cannot take credit for creating these. My sister in law showed me how to make these about 3 or 4 years ago. I don't know where she came up with this and I just want to say that I am not trying to take away from anyone. I just would like to share with those of you out there, what was once shared with me.
So, you all need to get your canes started and ready for Monday which I am hoping to have step 2 ready for ya. That is the messy step. You are going to need:
newspapers-cut into small strips (to wrap around the candy canes)
water, flour, and Elmer's glue
Sounds interesting, huh?! It is fun but, messy! I also use the lid to a tote container to put these on to dry for a few days. You will want something like that, so that they can be flipped over often and not stick to. I think that is it for today. Get making your canes up.
Before I let you all go, I wanted to mention that Pamela over at: http://ourpioneerhomestead.blogspot.com/ has got an awesome feather tree tutorial. She bought a small Christmas tree at the thrift store and turned it into an amazing little feather tree. Great fun project for the week end........ just sayin!!!
Have a great week end all.
Warm and primitive blessings to you all!
prim_bug
Anyway the first part of this is just your aluminum foil. Simple, right?! I remember a while ago I told you to start saving your pieces of aluminum foil for this and I hope that you all did. Here's a look at my piece;


Now, I would like to say that I cannot take credit for creating these. My sister in law showed me how to make these about 3 or 4 years ago. I don't know where she came up with this and I just want to say that I am not trying to take away from anyone. I just would like to share with those of you out there, what was once shared with me.
So, you all need to get your canes started and ready for Monday which I am hoping to have step 2 ready for ya. That is the messy step. You are going to need:
newspapers-cut into small strips (to wrap around the candy canes)
water, flour, and Elmer's glue
Sounds interesting, huh?! It is fun but, messy! I also use the lid to a tote container to put these on to dry for a few days. You will want something like that, so that they can be flipped over often and not stick to. I think that is it for today. Get making your canes up.
Before I let you all go, I wanted to mention that Pamela over at: http://ourpioneerhomestead.blogspot.com/ has got an awesome feather tree tutorial. She bought a small Christmas tree at the thrift store and turned it into an amazing little feather tree. Great fun project for the week end........ just sayin!!!
Have a great week end all.
Warm and primitive blessings to you all!
prim_bug
Thursday, November 8, 2012
TEMPTATION TUESDAY ON .... THURSDAY!!!!!!!
Hello everyone. Yes, it has been a while. I just got my butt whooped from Samantha because it had been so long! YIKES! She really does keep me grounded and I am very thankful for that. I tease here a lot but, if not for her, I probably would have stopped doing this and let things go. So Sam, thank you for those harassing phone calls. Love ya girl!!!!!!
Where I missed Tuesday (I was busy--- sister had a man here installing her new propane stove and I had to do elections. Didn't get home from counting ballots until about 12:45 am. Long night as well). Not and excuse.... just sayin. LOL!!!!! I decided that I had better post my recipes. So, for today I decided to post the recipe for what I made for supper last night. Oh my word. Crazy yumminess!!!! I had seen the commercial for Philadelphia cooking creme and I decided that I would look up that recipe and give it a try. I am always up for something new. So glad that I did. This was absolutely delicious. I hope that you give it a whirl. (Samantha---I think that your mom would Love this)!!
SHRIMP CARBONARA
1/2 # spaghetti, uncooked (I used wheat thin spaghetti)
4 slices bacon chopped- (I had my husband stop at the local store and pick up 4 slices bacon that they
had cooked---that saved time and I didn't have to open a pkg and only use
4 slices and put the rest away for another day. It only cost $.54.)
1 # uncooked, deveined peeled, large shrimp (I used the cooked frozen shrimp from the grocery store
and I just pulled the tails off them and added them at
the end so that they would just heat through)
1 c frozen peas
1 tub Philadelphia Italian Cheese and Herb Cooking Creme
1/4 c grated parmesan cheese
*I also added 1 pkg of fresh mushrooms when I added the peas
*I also added chopped green onions over the top when it was done
*When I cook bacon in the oven on a rack, I save some of the drippings in a small container in the refrigerator, for times when I need the extra flavoring, like this. So, I added 1 tbsp in the skillet.
For the original recipe go to the Kraft recipes.com. I started to put in on here as well as what I did but, it got to confusing to follow. I am just going to put what I did. If you are using uncooked shrimp---please use their recipe--mine is for the cooked shrimp.
Cook your spaghetti in a large pot. While that is cooking; I added my bacon fat to a large skillet. To that, I added mushrooms, peas and bacon. I let that cook on a low temp. for a few minutes. While that was cooking, I pulled the tails off the cooked shrimp that I had (these were on sale for $5.99 a pound). I then waited for the spaghetti to finish cooking. I didn't drain it, I added the noodles to my pan using tongs and let the water go into the skillet. The little bit of water that went in with the noodle was very useful and I actually scooped out a little more to add in as well. After that I added the cooking creme and mixed it all in. This is where you might decide to put in a little more of the spaghetti water to help loosen everything. Next you add in your shrimp and then your parm cheese. Mix this in and let everything get warm through. Then sprinkle with green onions and this is delicious.
I hope that I did not make this more confusing than it was. This only took about a half hour total to prepare. I will be making this again real soon. The hubby LOVED this and it was so easy. I could make this one quite often.
For the next recipe I thought that I would share one that my niece Amanda shared from Pinterest. This is the perfect recipe for the weather that we have been getting....snow! This should help to warm you up.....
HOT VANILLA
1/2 c whipping cream
1 tbsp chocolate syrup
dash of cinnamon
1 c hot milk - per hot vanilla
2 tsp sugar - per hot vanilla
1/2 tsp vanilla extract - per hot vanilla
Start with the topping. In a medium bowl, whip 1/2 c of whipping cream until it's frothy. Add 1 tbsp of chocolate syrup and a dash of cinnamon, then continue to whip the mixture until everything is well blended and peaks form. Makes enough to top about 6 drinks.
For each hot vanilla, microwave l cup of hot milk and 2 teaspoons of sugar in a mug for 90 seconds. Stir in 1/2 tsp of vanilla extract. Top with a dollop of chocolate cream, a drizzle of chocolate syrup, and a dash of cinnamon.
Oh my yumminess!!!!!!!!! What a perfect drink for when it is cold and snowy outside! Love this!!!
One more thing before I let you go. I wanted to show a picture of the candy canes that I hope to have the tutorial for next week. I hope that you all like these. I had a blast making them and if I remember right each step takes a couple of days. So, I need to post the tutorial so that you all can make some for your Christmas trees!!!!!
 I thought that they would look great on the Christmas table runner but, it didn't show them up as well as I had hoped so here's another look:

Aren't they amazing????? I think that they are. You can use these on anything or in anything. On gifts, trees, in bowls, you name it. You can make them any size that you want. And to think that they are made using aluminum foil and papier mache. So, even though I don't get on here every day...keep checking in with me. The instructions as I remember them are soon to follow...!!!!!!!
I hope that you have all had a good week and continue on with a great day! Still keeping in mind the poor people that have suffered so much devastation and loss. Keep them in all our thoughts and prayers.
Warm primitive blessings to you all!!!!
prim_bug
Where I missed Tuesday (I was busy--- sister had a man here installing her new propane stove and I had to do elections. Didn't get home from counting ballots until about 12:45 am. Long night as well). Not and excuse.... just sayin. LOL!!!!! I decided that I had better post my recipes. So, for today I decided to post the recipe for what I made for supper last night. Oh my word. Crazy yumminess!!!! I had seen the commercial for Philadelphia cooking creme and I decided that I would look up that recipe and give it a try. I am always up for something new. So glad that I did. This was absolutely delicious. I hope that you give it a whirl. (Samantha---I think that your mom would Love this)!!
SHRIMP CARBONARA
1/2 # spaghetti, uncooked (I used wheat thin spaghetti)
4 slices bacon chopped- (I had my husband stop at the local store and pick up 4 slices bacon that they
had cooked---that saved time and I didn't have to open a pkg and only use
4 slices and put the rest away for another day. It only cost $.54.)
1 # uncooked, deveined peeled, large shrimp (I used the cooked frozen shrimp from the grocery store
and I just pulled the tails off them and added them at
the end so that they would just heat through)
1 c frozen peas
1 tub Philadelphia Italian Cheese and Herb Cooking Creme
1/4 c grated parmesan cheese
*I also added 1 pkg of fresh mushrooms when I added the peas
*I also added chopped green onions over the top when it was done
*When I cook bacon in the oven on a rack, I save some of the drippings in a small container in the refrigerator, for times when I need the extra flavoring, like this. So, I added 1 tbsp in the skillet.
For the original recipe go to the Kraft recipes.com. I started to put in on here as well as what I did but, it got to confusing to follow. I am just going to put what I did. If you are using uncooked shrimp---please use their recipe--mine is for the cooked shrimp.
Cook your spaghetti in a large pot. While that is cooking; I added my bacon fat to a large skillet. To that, I added mushrooms, peas and bacon. I let that cook on a low temp. for a few minutes. While that was cooking, I pulled the tails off the cooked shrimp that I had (these were on sale for $5.99 a pound). I then waited for the spaghetti to finish cooking. I didn't drain it, I added the noodles to my pan using tongs and let the water go into the skillet. The little bit of water that went in with the noodle was very useful and I actually scooped out a little more to add in as well. After that I added the cooking creme and mixed it all in. This is where you might decide to put in a little more of the spaghetti water to help loosen everything. Next you add in your shrimp and then your parm cheese. Mix this in and let everything get warm through. Then sprinkle with green onions and this is delicious.
I hope that I did not make this more confusing than it was. This only took about a half hour total to prepare. I will be making this again real soon. The hubby LOVED this and it was so easy. I could make this one quite often.
For the next recipe I thought that I would share one that my niece Amanda shared from Pinterest. This is the perfect recipe for the weather that we have been getting....snow! This should help to warm you up.....
HOT VANILLA
1/2 c whipping cream
1 tbsp chocolate syrup
dash of cinnamon
1 c hot milk - per hot vanilla
2 tsp sugar - per hot vanilla
1/2 tsp vanilla extract - per hot vanilla
Start with the topping. In a medium bowl, whip 1/2 c of whipping cream until it's frothy. Add 1 tbsp of chocolate syrup and a dash of cinnamon, then continue to whip the mixture until everything is well blended and peaks form. Makes enough to top about 6 drinks.
For each hot vanilla, microwave l cup of hot milk and 2 teaspoons of sugar in a mug for 90 seconds. Stir in 1/2 tsp of vanilla extract. Top with a dollop of chocolate cream, a drizzle of chocolate syrup, and a dash of cinnamon.
Oh my yumminess!!!!!!!!! What a perfect drink for when it is cold and snowy outside! Love this!!!
One more thing before I let you go. I wanted to show a picture of the candy canes that I hope to have the tutorial for next week. I hope that you all like these. I had a blast making them and if I remember right each step takes a couple of days. So, I need to post the tutorial so that you all can make some for your Christmas trees!!!!!


Aren't they amazing????? I think that they are. You can use these on anything or in anything. On gifts, trees, in bowls, you name it. You can make them any size that you want. And to think that they are made using aluminum foil and papier mache. So, even though I don't get on here every day...keep checking in with me. The instructions as I remember them are soon to follow...!!!!!!!
I hope that you have all had a good week and continue on with a great day! Still keeping in mind the poor people that have suffered so much devastation and loss. Keep them in all our thoughts and prayers.
Warm primitive blessings to you all!!!!
prim_bug
Subscribe to:
Comments (Atom)